Note: The Renew Me Skin Rejuv is now out of stock and will not be replaced.
This page is password protected because we do not sell the Skin Rejuv to the public, it is a device that is only sold to Gym Members.
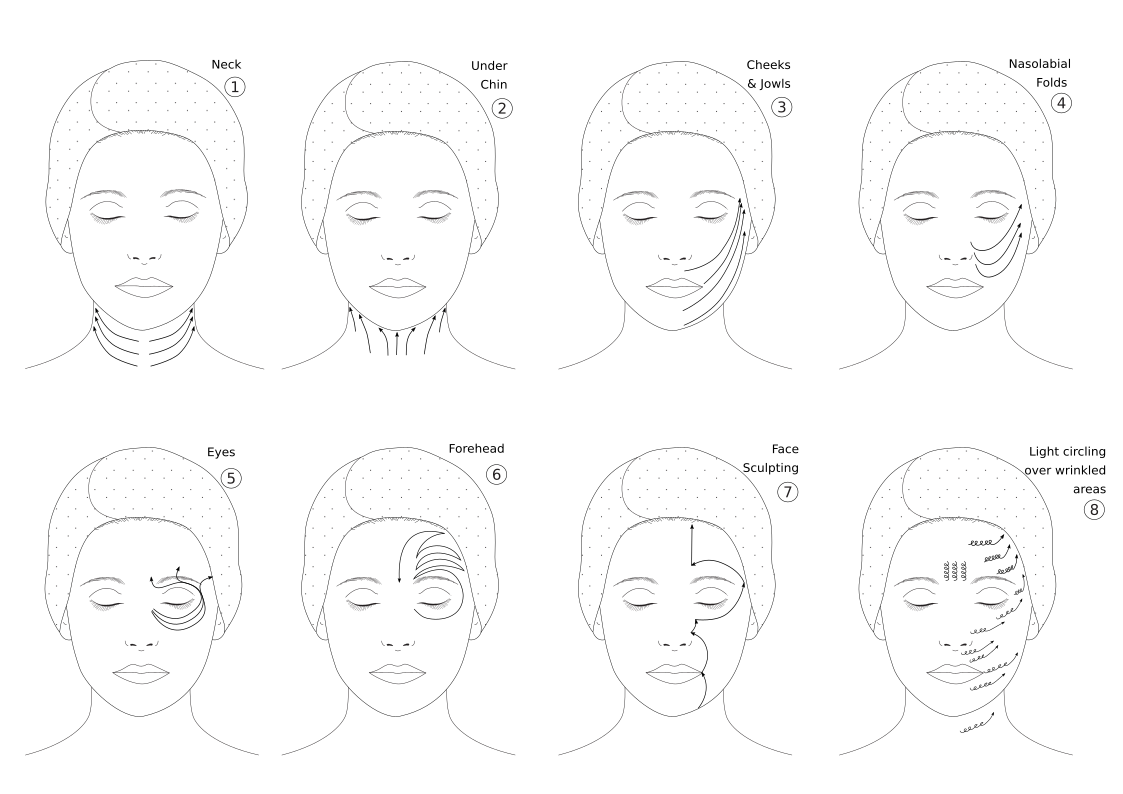
Instructions for the Rejuv Treatment (follow the numbers and the diagram of each step)
During the entire treatment if the serum is absorbed into the skin, spray a small amount of water over the neck area where the serum was applied to extend the serum.
Other than the neck & chin area, treat the right side of your face first, after repeating all of the movements 3 times, move to the left side of your face.
It is important that you follow each step to gain maximum results.
Use 3 times a week. ie - Monday, Wednesday, Friday or something similar with a day in between 3 days a week.
STEP ONE - NECK
- Gently apply the Serum over the whole the neck. Do not rub it in.
- Starting at the right side, following the arrows work the Skin Rejuv 3 times, moving upwards each time. When you reach the back of the ear, pull the skin gently with the device, upwards and hold for 3 seconds.
- Repeat 3 times on the right hand side of the neck.
- When finished the right side, move to the left side.
- Repeat both sides 3 times.
STEP TWO - UNDER CHIN
- Holding the Rejuv with your forefingers over the on / off buttons, starting on the right hand side, move the device from just under your jaw line, upwards to the back of your ear and hold.
- Following the arrows, move the device upwards and holding for 3 seconds
- Repeat until reached the left side.
- Repeat both sides 3 times.
STEP THREE - JOWLS & CHEEKS
- Apply one pump of serum gently to the jowl and cheek area. Do not rub it in.
- Following the arrows, start at the middle, bottom of your chin and run the device along your jawline and upwards to the ear lobe. Hold for 3 seconds.
- Move to the middle of your chin and sweep the device slowly along your cheek and upwards to the earlobe. Hold for 3 seconds.
- Move to the corner of your mouth area, sweep the device slowly up along your cheek to the temple. Hold for 3 seconds.
- Move to the centre of your top lip, sweek the device slowly up along your cheek to the temple. Hold for 3 seconds.
- Repeat 3 times.
STEP 4 - NASOLABIAL FOLDS
- Starting from your just under the nostril, sweep the device downwards along the nasolabial fold, then sweep upwards to the temple area. Hold for 3 seconds.
- Moving to even with the nostril, sweep the device downwards along the nasolabial fold, then sweep upwards to the temple area. Hold for 3 seconds.
- Moving to just above your nostril, sweep the device downwards along the nasolabial fold, then sweep upwards to the temple area. Hold for 3 seconds.
- Repeat 3 times.
STEP 5 - EYES
- Closing your eyelid, and starting from the lowest part of the eye area near the lower part of the bridge of the nose (as shown in picture #5) sweep the device along the lower cheek bone area, over the closed eyelid, to the corner of the eyebrow nearest to the inside of the eyebrow area. Hold for 3 seconds lifting the inside brow.
- Lift off the device from the brow, moving back to under the eye area sweep the device along the lower cheek bone area, over the closed eyelid, moving the device to the centre of the brow area (as shown in picture #5). Hold for 3 seconds lifting the centre brow.
- Lift off the device from the centre brow, moving back to under the eye area sweep the device along the lower cheek bone area, over the closed eyelid, moving the device to the outermost part of the eye (as shown in picture #5). Hold for 3 seconds lifting the outermost part of the eye.
- Repeat 3 times.
STEP 6 - FOREHEAD
- Placing the device under the eye once more, sweep the device around the top of the eye brow to the centre of the side you are treating. Sweep the device in a back and forward motion as shown in picture #6. Finish at the very top of the forehead, and move the device directly downwards to the middle of the brow.
- Repeat 3 times.
STEP 7 - FACE SCULPTING
Apply one pump of serum gently to the skin. Do not rub in.
You will be using a small amount of pressure with the device, gently pulling the skin in an upwards motion whilst performing this treatment.
Treat the right hand side first 3 times, when you finish move to the left hand side.
- Place the device at the bottom of your jaw line.
- Move the device to the corner of your mouth
- Move the device to just above your nostril
- Move the device to just under the innermost corner of your under eye
- Sweep the device to your temple area
- Sweep the device to the beginning of the brow
- Sweep the device upwards to the top of your forehead
- Repeat 3 times.
- Repeat on the left hand side.
STEP 8 - DANGER AREAS TREATMENT (my favourite!)
At this stage, you can move to the areas that you feel need extra treatment. Do not spend more than 5 minutes on each place, otherwise you will overstimulate the area and create the skin to go into detox. This means you will start to have breakouts over your face.
Picture #8 shows how to work "danger areas" by using a light circling movement over the area. Always moving the device upwards and sweeping to either the earlobe or the temple area and holding for 3 seconds.
WARNINGS
If you find that the device is heating up on your face, remove it immediately, allowing for it to cool down and then continue with the treatment.
TIMINGS
First treatment - 10 minutes for each side of face (20 minutes in all)
Face Sculpting - 5 minutes for either side of the face (10 minutes in all)
Danger Treatments - 5 minutes MAXIMUM for each danger area. Do not treat the whole face again. Only the areas such as frown lines, nasolabial folds, eye area or marionette lines.